Whether you’re a renter, a condo owner, or a homeowner, the reason you have home insurance is to protect yourself and what’s yours. But if disaster strikes—say a fire, break-in, or major water leak—how do you prove what you had for insurance?
That’s where a home inventory comes in.
A home inventory is a detailed record of your personal belongings, and it’s something everyone should have before the unexpected happens. It can help speed up the claims process, ensure you’re properly compensated, and avoid disputes with your insurer.
In this guide, you’ll learn exactly how to make a home inventory list, with step-by-step instructions, an easy-to-copy template, and a breakdown of what to include.

What is a home inventory?
A home inventory is a document that lists all the belongings you own, along with important details like their value, description, and purchase date. It may also be referred to as a personal property inventory or household contents list.
Here are some examples of the types of items that you should consider including:
- Major appliances
- Small appliances (ex. air fryer, blender, toaster, coffee maker, etc.)
- Kitchenware, dishware, and glassware
- Furniture
- Decor and furnishings
- Seasonal items (ex. holiday decor, patio furniture, etc.)
- Clothing, footwear, and accessories
- Jewelry and watches
- Electronics, personal tech, and gaming systems
- Physical media (ex. books, games, records, DVDs, etc.)
- Sports and fitness equipment
- Musical instruments
- Tools and equipment
Because most people accumulate more items over time, creating a complete inventory can take a while, and that’s perfectly normal. The key is to be thorough and update it regularly, especially after big purchases or major life changes.
What should a home inventory include?
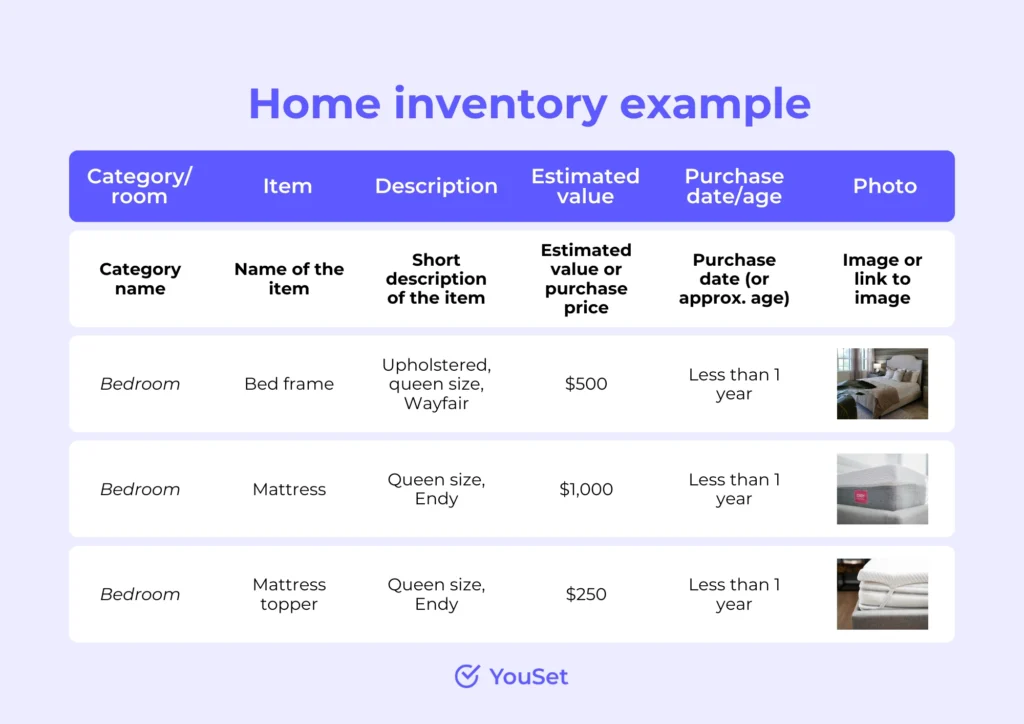
Since most people create a home inventory for insurance purposes, it’s important to include the details your insurer would need if you ever have to file a claim. At a minimum, your home inventory should include:
- Name of each item
- Short description of each item
- Estimated value or purchase price
- Purchase date (or approximate age)
- Photo of each item
- Receipt, serial number, or appraisal (if available)
Making a home inventory is no small feat, especially if you own a lot of belongings or live in a larger home. Start small with the basics and add more details progressively to make the process more manageable.
How to make a home inventory for insurance
If you’re creating a home inventory for insurance purposes, there are a few ways to go about it:
- Use a pre-made template
- Download an app
- Make one from scratch
What matters most isn’t how it looks—it’s whether it contains the right information. Focus on finding a method that works for you and captures the details your insurer will need if you ever have to make a claim.
Use a home inventory template
If you’ve never made a home inventory before or just want something simple that gets the job done, use a home inventory template like the one below. It includes space for all the key details so you don’t miss anything important that your insurer might need if you ever need to file a claim.
Use a home inventory app
There’s an app for everything – including creating an inventory of your belongings! A good one, though, will let you easily catalogue your belongings by room, type, or value, add photos/receipts, and download/export a list that can be shared with your insurer in the event of a claim.
Here are a few examples of home inventory apps available in Canada for you to explore:
- Nest Egg Inventory
- HouseBook Home Inventory
- Pocket Inventory
- Minvy: My Inventory
- NAIC Home Inventory
- iCollect Everything Inventory
Create one from scratch
A home inventory doesn’t need to be fancy, as long as it includes the key details your insurer would need to process a claim. If you can’t find a template or app that fits your needs or preferences, creating your own from scratch is always an option.
Home inventory template for insurance
As you can see from the home inventory template below, a simple chart will do the trick. What matters most is including all the necessary information and ensuring it can be accessed from any device, so a cloud-based tool like Google Sheets or Microsoft Excel Online is ideal.
Once you’re ready to get started, follow these step-by-step instructions to make a home inventory list in Google Sheets (it’s free, cloud-based, and user-friendly!):
- Open a New Google Sheet (or your preferred cloud-based tool).
- Create columns for each category
- Column A: Category/room
- Column B: Item name
- Column C: Description
- Column D: Estimated value
- Column E: Purchase date/age
- Column F: Photo
- In the first row under your header in Column A, select Insert > Dropdown. In the sidebar that pops up, enter as many categories (ex. furniture, electronics, etc.) or rooms (ex. living room, kitchen, etc.) as you’d like
- Add one item per row and fill in the appropriate information
- For photos, upload them to your cloud storage and link to them in the “Photo” column
Why do insurance companies ask for a home inventory?
If your belongings are ever damaged, destroyed, or stolen due to a covered event—like a fire, break-in, or water leak—you might file a home insurance claim. Depending on the circumstances, your insurer might then ask for an inventory of what you’re looking to be compensated for.
While it might feel tedious, having a home inventory can work in your favour. Here’s why:
- Speeds up claim: An itemized record with photos can help your insurer process your claim more quickly.
- More accurate compensation: Can increase the chances of being reimbursed for what you actually owned, not just what you remember.
- Reduces the chance of disputes: Can help avoid disagreements with your insurer about what was lost or damaged.
We do the searching, you get the savings